Category Archives: Security

Extending existing Kerberos authentication to a new Lync Server 2013 deployment

Recently I was deploying Lync Server 2013 into an existing Lync Server 2010 environment that had Kerberos authentication configured for web services. Based on TechNet documentation, I was under the impression the new servers would take up the Kerberos account assignment automatically, but I was wrong.

We found that Lync 2013 failed to sign into the Lync Server 2013 pool. When we checked Fiddler, we were getting back an Unauthorised response from the Lync Server 2013 pool.

Synchronise the Kerberos Authentication Account to Lync Server 2013

After a deeper dig into TechNet (specifically the article Synchronize a Kerberos Authentication Account Password to IIS), I found that I needed to synchronise the existing Kerberos account from a Lync Server 2010 server to the new Lync Server 2013 Front End servers.

To do this, I ran this cmdlet to synchronise the Kerberos account from the 2010 pool to the 2013 server:

Set-CsKerberosAccountPassword -FromComputer 2010pool.contoso.com -ToComputer 2013fe1.contoso.com

I repeated this for each Lync Server 2013 Front End server just to cover all the bases.

Validation

Finally, I validated that the 2013 servers had the Kerberos account synchronised to them using the Test-CsKerberosAccountAssignment cmdlet from the TechNet article Test and Report Functional Readiness for Kerberos Authentication.

To do this, I ran the following cmdlet to generate a report that showed me that the 2013 servers had the account synchronised to them:

Test-CsKerberosAccountAssignment -Identity “site:UK” -Report “c:\logs\KerberosReport.htm” -Verbose

Once the report was generated, I opened it up to check that the new Lync Server 2013 Front End servers were listed and were marked as Successful.

When this process was completed, Lync 2013 successfully signed into the new Lync Server 2013 pool.

Why You Should and Shouldn’t Configure Unique Conference IDs in Lync

In a previous post Understanding Conference Security in Lync Server 2010, I detailed the difference between public and private meetings, how assigned conferences work in Lync and the user experience. When you first deploy and configure Lync, users schedule meetings with the same meeting join URL and conference ID every time. However there are some scenarios where this ease of access exposes a vulnerability, especially if there is heavy conference usage. In this post, I’m going expand to on my last post to cover the business reasons why you’d want to configure unique URLs/conference IDs and what the pros and cons are of configuring this. Continue reading

Excluding local intranet hyperlinks when configuring URL filtering for Microsoft Lync Server 2010

Recently I needed to setup URL filtering on Lync Server for a project. Pretty simple task you’d think, but I needed to exclude local intranet hyperlinks from being blocked as well. I found out that this is much easier said than done in Lync.

The Problem

Everything exists in the Lync Server Control Panel for this, and there is advice here on TechNet to configure it, but it’s very vague and only scratches the surface as to what is actually required. To get this working, you need to add the URLs you want to exclude to the Local Intranet Sites zone on each Front End Server, as per TechNet.
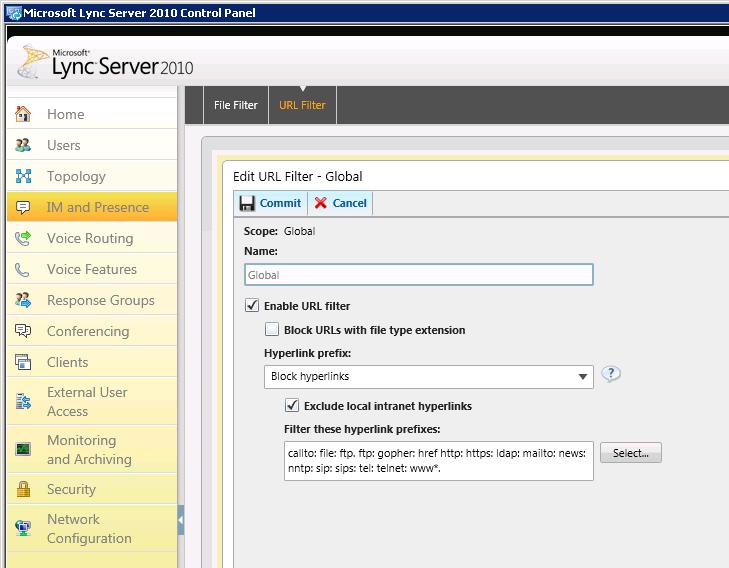
URL filtering in Lync Server 2010

The URL Filter page in the Lync Server 2010 Control Panel

Sounds easy enough right? Wrong. Because the Lync Front End Server service now runs under the Network Service account, you can’t just open up your Internet Options and pop them in there, you need to open Internet Options as the Network Service account.

Usually to execute an application under a different account, you can use the runas command, which would look like this:

runas /user:”NT Authority\Network Service” “C:\Program Files\Internet Explorer\iexplore.exe”

This doesn’t work properly though, because you’re prompted for the Network Service password, which we don’t know (because this is a system account). The way around this then, is using the PsExec tool from SysInternals. The process to point you in the right direction for doing this is detailed here by Ben Parker (hat tip to Paul Nearney, a fellow Modality rockstar for bring this to my attention).

So using PsExec, the command we want to run is:

psexec -i -u “NT Authority\Network Service” “C:\Program Files\Internet Explorer\iexplore.exe”

This then fires up Internet Explorer for us, but we’re greeted with this when we open Internet Options:
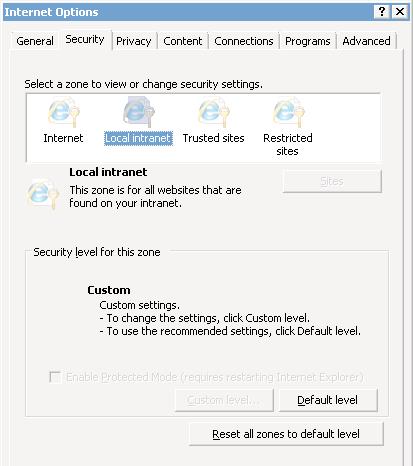
internet options when opened using Network Service account

The Internet Options dialog when executed under the Network Service account

Pretty useless really, because we can’t change anything! We can’t click on Sites to add the URLs we want to exclude, so we’re stuck. This is where I escalated this problem to Microsoft.

The Workaround

I engaged Microsoft PSS and after some investigation and reproduction of the issue, the engineer (thanks to Debasis Mishra) and the Lync Product Group identified this as a bug and came back with a workaround.

To get this working today, we need to do a bit of registry hacking to add local intranet URLs manually to the Local Intranet zone:
The Network Service like all AD objects has a SID and that is unique and common across all. The SID of Network Service account is S-1-5-20.

  1. Launch the registry on the Lync Front End server and browse to HKEY_USERS\S-1-5-20\Software\Microsoft\Windows\CurrentVersion\Internet Settings\ZoneMap\Domains (in case you don’t find ZoneMap and Domains, create new keys with these names in the Internet Settings key).
  2. From here, we can add the first Intranet site which is, let’s say for example http://contoso.com.
  3. Under Domains, create a new key and name it contoso.com.
  4. Next, create a DWORD with name http and set the value to 1. You can do the same for https if you need this.
  5. Similarly for a second site, create a key and name it contoso.local for example.
  6. Here you need to create DWORD(s) for each protocol you want to allow. Let’s say one with the name https and the other with the name ftp. Set the value to 1 for both.
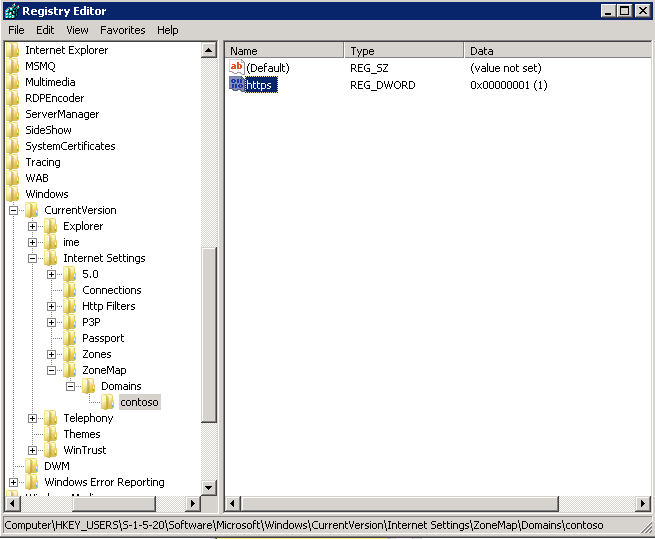
    Excluding local intranet URLs from filtering in the Windows registry

    Excluding local intranet URLs from filtering in the Windows registry

  7. Once done, restart the FE service and you should now be able to send IMs with the intranet URLs you’ve specified e.g. http://www.contoso.com

And there you have it, that’s how you do it my friends. A bit convoluted right now and messy, but it get’s the job done. Hopefully a hotfix will be released in an upcoming Cumulative Update and the documentation will be updated.

Let me know if you have any problems with it in the comments section below.

Microsoft Lync Server 2010 Web Scheduler Released

This is great news and benefits me personally because I use Communicator for Mac and don’t have the Online Meeting Add-In for Outlook. What this now enables is a web-based way of scheduling and managing your meetings using Lync (which was available in OCS 2007 R2). It allows you to do the following:

  • Schedule a new online Lync meeting.
  • List all existing Lync Server 2010 meetings that you’ve organised.
  • View and modify details of an existing meeting.
  • Delete an existing meeting.
  • Send an email invitation to meeting participants by using a configured SMTP mail server.
  • Join an existing conference.

if we compare this to what the Online Meeting Add-In for Outlook can do, here’s where the shortcomings are:

  • Lync Web Scheduler does not support scheduling recurring meetings.
  • Lync Web Scheduler lists only meetings that were organized by the user. It does not list all meetings that the user is invited to. Further, meetings created using some other tool will not be editable using Lync Web Scheduler.
  • Lync Web Scheduler is available only in English.
  • Meeting invitations that are generated by Lync Web Scheduler do not look exactly the same as those that are generated by the Online Meeting Add-In for Outlook.
  • Lync Web Scheduler doesn’t interact with the calendaring server. Calendar updates happen only via email invitations.

The download is available here. Install is pretty quick and simple, and it installs as a virtual directory onto IIS on your Lync Front End server. Note that if you have multiple front end servers as part of a pool, you’ll need to install the Web Scheduler on each front end server.

Once it’s installed, you’ll need to setup an SMTP server for it to use to send out meeting invites. This is covered in the Readme file so I won’t reinvent the wheel.

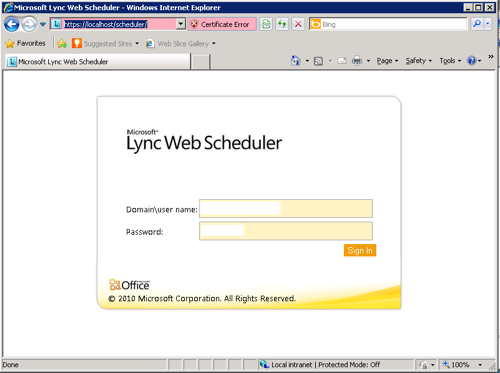
To access the Web Scheduler itself, navigate to https://YourPoolWebFQDN/scheduler (e.g. https://lyncweb.domain.com/scheduler) and authenticate, which looks like this:

Lync Web Scheduler Login

Make sure you use your Web URL, not your Pool URL if you have a DNS load balanced pool. Otherwise you’ll see nothing but a blank screen after login.

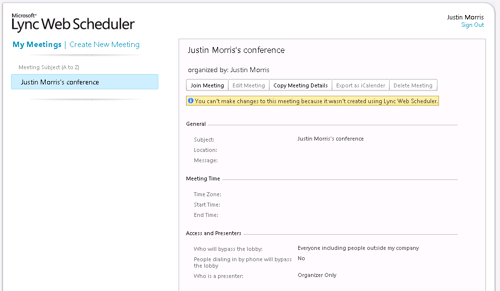
Once you’ve logged in, you’ll be presented with the Lync Web Scheduler. From here you can view your current meetings and also create new ones, as illustrated below:

Lync Web Scheduler

Pretty easy huh? Now go forth and deploy and get your Mac and web-based clients scheduling meetings on Lync!